samedi 28 juillet 2012

[Windows Server 2012] Tuning the Tools Menu in Server Manager

The new Server Manager Console in one of the great new features of Windows Server 2012.

It reminds me a famous quote :
One Console to rule them all, One Console to find them,
One Console to bring them all and in Server Manager bind them

The Tools Menu contains all the administrative Tools of the server.


You can create a folder structure on the Tools menu to organize your Tools as you want.

For this you have to create a folder in the Administrative Tools folder. This can't be done directly as you can't create folders in this folder.
So, create a folder elsewhere and move the folder in the Administrative Tools folder.
It's as simple as that.

For example I create one folder for AD Tools.


And then I move the Administrative Tools in this folder.


You can also add other Tools, you just have to create a shortcut and move it in the Administratives Tools.

For example my server has Script Explorer installed on it.
I just copy the shortcut.


You can also launch script directly from the Server Manager using the same method.


As you can see you can add many things in the Tools Menu of the new Server Manager Console.

And if you don't want to use the new Metro UI, you can consolidate all your Tools in the Server Manager Console.

jeudi 26 juillet 2012

[Microsoft Solution Accelerators] Virtual Machine Converter Release Candidate Available

 The Microsoft Virtual Machine Converter Release Candidate is available.

The Microsoft Virtual Machine Converter (MVMC) provides a Microsoft-supported, freely available, standalone solution for converting VMware virtual machines (VMs) and VMware virtual disks (VMDKs) to Hyper-V virtual machines and Hyper-V virtual hard disks (VHDs).


What is New in the Release Candidate?

In addition to the capabilities delivered as part of the Beta release, the Microsoft Virtual Machine Converter release candidate:

  • Converts and deploys virtual machines from VMware hosts to Hyper-V hosts running:
    •     Windows Server® 2012 Release Candidate
    •     Microsoft Hyper-V Server 2012 Release Candidate
  • Adds virtual network interface cards (NICs) to the converted virtual machine on Hyper-V.
  • Configures dynamic memory on the converted virtual machine.
  • Supports migration of virtual machines that are hosted on a vSphere cluster.
  • Supports migration of virtual machines to a Hyper-V host that is part of a failover cluster.
  • Enables Microsoft partners to cobrand the tool so that it incorporates their logos.


System Requirements

The Microsoft Virtual Machine Converter converts VMware virtual machines created with:
  • VMware vSphere 4.1
  • VMware vSphere 5.0

To virtual machines for:
  • Windows Server 2008 R2 SP1 Hyper-V
  • Microsoft Hyper-V Server 2008 R2 SP1
  • Windows Server® 2012 Release Candidate
  • Microsoft Hyper-V Server 2012 Release Candidate


Details

The Microsoft Virtual Machine Converter:
  • Provides a quick, low-risk option for VMware customers to evaluate Hyper-V
  • Converts the virtual disks and the VMware VMs configuration, such as memory, virtual processor, and other machine settings from the source
  • Uninstalls the VMware tools on the source VM and installs the Hyper-V Integration Services as appropriate
  • Includes an easy-to-use wizard-driven GUI simplifying VM conversion Supports offline conversions of VMware virtual hard disks (VMDK) to a Hyper-V based virtual hard disk file format (VHD)
  • Includes a scriptable Command Line Interfaces (CLI) for performing machine conversion and offline disk conversion which integrates with datacenter automation workflows, such as those authored and executed within System Center Orchestrator. The command line can also be invoked through PowerShell.


Microsoft Virtual Machine Converter Release Candidate is available here : https://connect.microsoft.com/site14/Downloads/DownloadDetails.aspx?DownloadID=42754

[Microsoft Solution Accelerators] IPD for SCVMM 2012 available

The IPD Guide for System Center 2012 Virtual Machine Manager is available.

This guide outlines the elements that are crucial to an optimized design of Virtual Machine Manager. It leads you through a process of identifying the business and technical requirements for managing virtualization, designing integration with Operations Manager if required, and then determining the number, size, and placement of the VMM servers. This guide helps you to confidently plan for the centralized administration of physical and virtual machines.

Infrastructure Planning and Design streamlines the planning process by:
  • Defining the technical decision flow through the planning process.
  • Listing the decisions to be made and the commonly available options and considerations.
  • Relating the decisions and options to the business in terms of cost, complexity, and other characteristics.
  • Framing decisions in terms of additional questions to the business to ensure a comprehensive alignment with the appropriate business landscape.


This guide is available here : http://go.microsoft.com/fwlink/?LinkId=245473

mercredi 25 juillet 2012

[Windows Server 2012] DAC : Implementing Access-Denied Assistance

Access-denied remediation is a new feature in Windows Server 2012, which provides different ways to troubleshoot issues that are related to access to files and folder.
 
 
I have added an Exchange 2013 server to my lab for this scenario.
So my lab consists now of 4 VM :
  • 1 Windows Server 2012 Domain Controller (DAC-SRV-AD01)
  • 1 Windows Server 2012 File Server (DAC-SRV-FIC01)
  • 1 Windows 8 Client (DAC-WIN8-CLT)
  • 1 Windows Server 2012 / Exchange 2013 (DAC-SRV-EXCH)

The configuration of Access-Denied Assistance requires 2 steps:
  • Configure Access-Denied Assistance
  • Configure the Email Notification Settings


First, I configure the Access-Denied Assistance by using Group Policy.


The first part of the configuration has been done.

Now we'll configure the Email Notification in FSRM.


And that's all. As you can see it's really easy to configure.

Now we can verify that Access-Denied Assistance works.

I log the user Carla Thomas on the client and try accessing the confidential folder.
I don't have access but you can see that you can Request Assistance.


Now I check administrator Emails and you can see that Administrator received the Request Assistance with all informations like the user and device claims.


As you can see Access-Denied Assistance is a really great feature of Dynamic Access Control and is very easy to implement.

For more information check this : http://technet.microsoft.com/en-us/library/hh831788

[Windows Server 2012] DAC : Implementing Central Access Policy Part 2 of 2

Now that the Active Directory steps have been done, here are the others steps.

We have to :
  • Enable support for claims and compound authentication by using Group Policy
  • Enable claim for devices by using Group Policy
  • Apply the central access policy across file servers by using Group Policy
  • Assign a central access policy to the file server


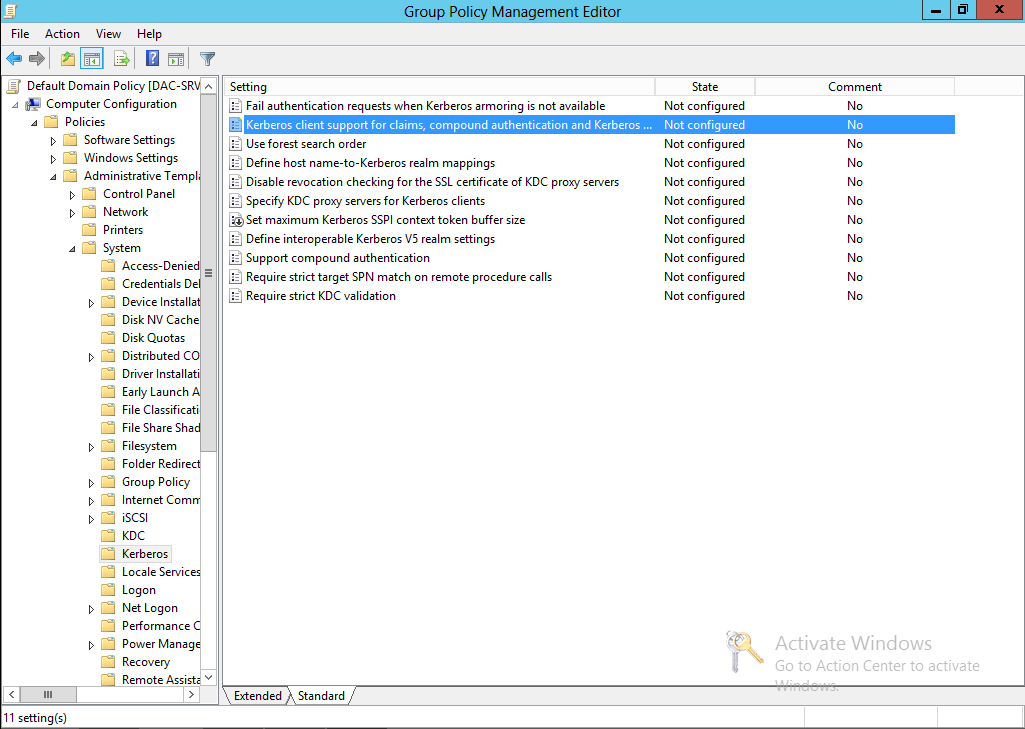
To enable support for claims and compound authentication we'll edit the Default Domain Controller Policy.
We have to edit only one setting.


Now, we have to enable claim for devices by editing the Default Domain Policy.


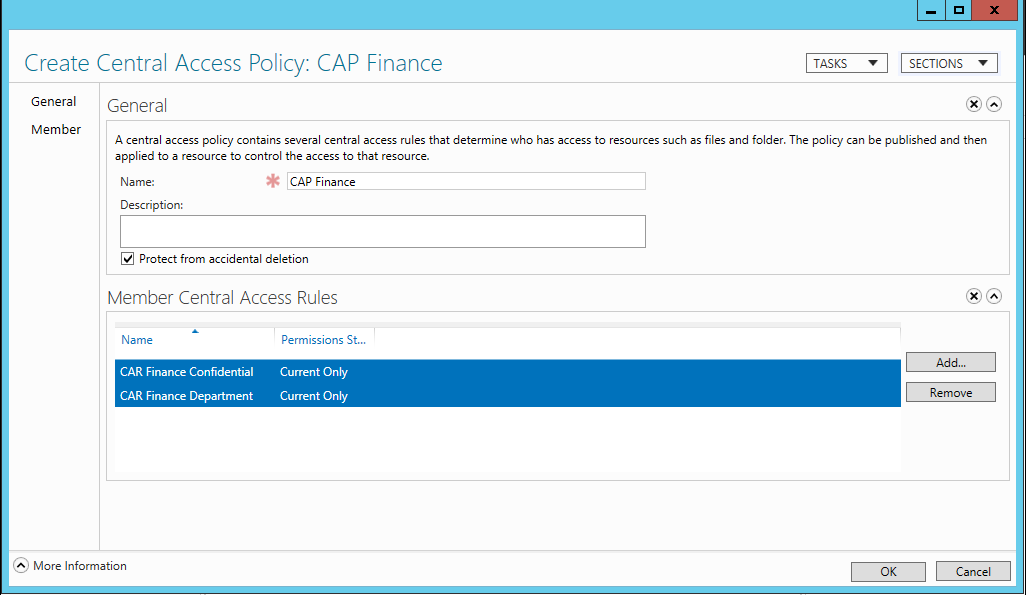
Now we have to apply the Central Access Policy we have created earlier on the File Server by creating a new GPO.


That's all for the Group Policy part.
Now we have to assign the Central Access Policy to the File Server.

First we have to refresh the Global Ressource Properties. This can be done with Powershell or through FSRM.


If you go on the Classification Properties, you can see that we have our two Ressource Properties, Department and Confidentiality.


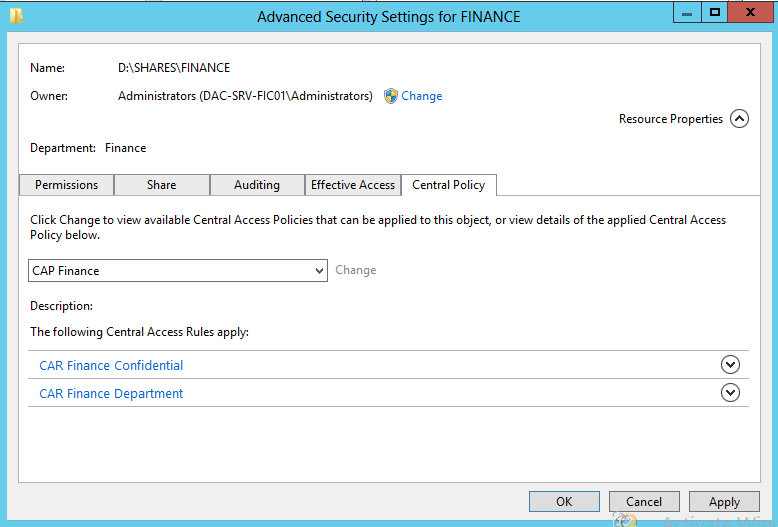
Now I go on the Finance folder to apply the Central Access Policy.
First I configure manually the Department classification on the Finance folder.


Then I apply the Central Access Policy.


I do the same for the CONFIDENTIAL sub-folder, add the confidentiality classification to High.
The Central Access Policy and the Department classification is inherited from the parent folder.


All the configuration for this scenario has been done.


Now we can verify that DAC is well implemented.

First, I will check that claim is enable for users. It can be done with the command : whoami /claims


We can now verify the effective access on the folder.

First at the Finance folder level with Carla Thomas.


We can see that the user has RW access.
Now I change the user claim and we can see that the user doesn't have access and this access is limited by CAR Finance Department.


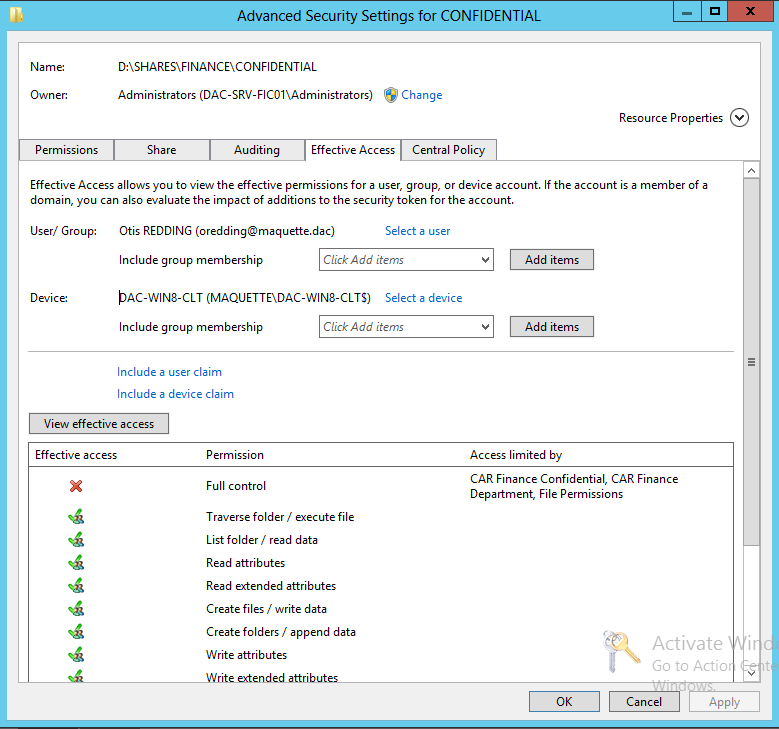
Now we go on the Confidential sub-folder.
The Confidential CAR require that the user and the device are from the Finance department and that the user is a member of the Confidential group.


If we modify the device claim we loose access.


That's all for the Central Access Policy part which is only one of the features of Dynamic Access Control.

If you want more information on this part check this : http://technet.microsoft.com/en-us/library/hh831425

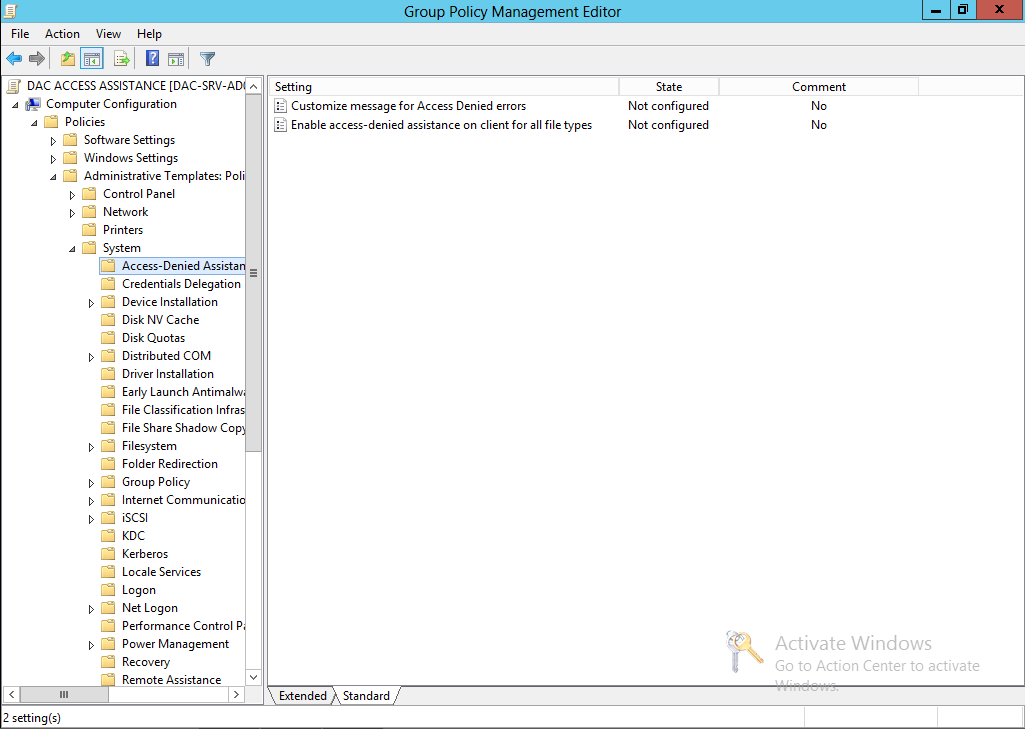
We'll see next Access-Denied Assistance feature.

[Windows Server 2012] DAC : Implementing Central Access Policy Part 1 of 2

I will start this series of articles on DAC by the implementation of Central Access Policy.

My lab consists of 3 VM :
  • 1 Windows Server 2012 Domain Controller (DAC-SRV-AD01)
  • 1 Windows Server 2012 File Server (DAC-SRV-FIC01)
  • 1 Windows 8 Client (DAC-WIN8-CLT)


The scenario I have choosen is the following :
My File Server hold a share containing data of two departments of the company (Finance and IT).
Access to the share are already configured with group permissions.

We have 3 users with the following access :
  • Carla Thomas : RW access to Finance
  • Otis Redding : RW access to Finance and RW access to Confidential data in Finance
  • Johnnie Taylor : RW access to IT 

I want to implement the following rules:
  • RW access to Finance for users who work at the Finance Department
  • RW access to Confidential folder for users who work in the Finance department with a computer of the Finance department and member of the Confidential group.
  • RW access to IT for users who work at the IT department


4 steps have to be done first in Active Directory, so we'll start by that.

First I have to create a claim type :

It can be done through Active Directory Administrative Center (ADAC) or with Powershell Cmdlet.
I will use ADAC with the new Windows Powershell History feature to show you both.

When you open the Overview part in ADAC, you have access to the different steps for implementing Dynamic Access Control.


So I start by creating a claim type. I choose the Department attribute and as I want to use this claim for users and devices, I check both User and Computer.


I can provisioned suggested values for this claim manually or use Data Classification Toolkit for this : http://gregorylucand.blogspot.fr/2012/05/data-classification-toolkit-active.html
But here I'll use the default values provided by the ressource properties.

So I create my claim type and here are the Powershell Cmdlet.


Now I have to configure the ressource properties. I'll use two ressource property : Department and Confidentiality.


And here are the Powershell Cmdlets.


Now I have to create Central Access Rules.
I will create Two Central Access Rules : one for the Department and one for the Confidentiality


I configure the Target Ressources.


Then I configure Permissions as follow :


I create the other Central Access Rule for Confidentiality.


Now that my two Central Access Rules are created I have to create the Central Access Policy.


All steps have been done for the Active Directory part.

The rest of the configuration will be available in the next article

[Windows Server 2012] Dynamic Access Control Ressources

I will begin a series of articles on implementing  DAC, if you don't know what DAC is, start by here.


In Windows Server 2012, you are able to apply data governance across your file servers to control who can access information and to audit who has accessed information. Dynamic Access Control provides:
  • Identify data – Automatic and manual classification of files can be applied to tag data in file servers across the organization
  • Control access to files - Central access policies enable organizations to apply safety net policies. For example, you could define who can access health information within the organization.
  • Audit access to files - Central audit policies for compliance reporting and forensic analysis. For example, you could identify who accessed highly sensitive information.
  • Apply RMS protection - Automatic Rights Management Services (RMS) encryption for sensitive Office documents. For example, you could configure RMS to encrypt all documents containing HIPAA information.

This feature set is based on infrastructure investments that can be further leveraged by partners and line-of-business applications and provide great value for organizations that use Active Directory. This infrastructure includes:
  • A new Windows authorization and audit engine that can process conditional expressions and central policies.
  • Kerberos authentication support for user claims and device claims.
  • Improvements to the File Classification Infrastructure.
  • RMS extensibility support so that partners can provide solutions that encrypt non-Office files.


If you want to learn more about DAC, check the following links :

http://blogs.technet.com/b/windowsserver/archive/2012/05/22/introduction-to-windows-server-2012-dynamic-access-control.aspx

http://blogs.technet.com/b/wincat/archive/2012/07/20/diving-deeper-into-windows-server-2012-dynamic-access-control.aspx


jeudi 19 juillet 2012

[Microsoft Exchange 2013] Data Loss Prevention

Data loss prevention (DLP) is an important issue for enterprise message systems because of the extensive use of email for business critical communication that includes sensitive data. In order to enforce compliance requirements for such data, and manage its use in email, without hindering the productivity of workers, Microsoft Exchange Server 2013 Preview includes DLP features that make managing sensitive data easier than ever before.

DLP policies are simple packages that contain sets of conditions, which are made up of rules, actions, and exceptions that message administrators create in the Exchange Administration Center (EAC) and then activate to filter email. You can create a DLP policy, but choose to not activate or enable it. This allows you to test your policies without affecting mail flow. DLP policies can use the full power of existing Exchange Transport Rules (ETRs). In fact, a number of new types of transport rules have been created in Exchange Server 2013 Preview in order to accomplish new DLP capability. One important new feature of ETRs is a new type of data classification that can be incorporated into mail flow processing. This new DLP classification engine performs deep content analysis through keyword matches, dictionary matches, regular expression evaluation, and other content examination to detect content that violates organizational DLP policies.

Here is an example of what you can do with DLP.

First I have to create a new DLP strategy.


When the strategy is created, I have to create rules in it.

As you can see with the model I choose in my strategy I have 4 rules created by default.


I remove these 4 rules to create my own rule.


Now I test this rule by sending a mail which contains the words "credit card number".


And here is the reject message the user receive.


DLP is a really great new feature of Exchange 2013 , simple and intuitive.

For more informations on DLP : http://technet.microsoft.com/en-us/library/jj150527(v=exchg.150)